Sign Up Screen - Log In Form
@import url('https://fonts.googleapis.com/css2?family=Open+Sans:wght@400;700&display=swap');
@import "reset.css";
@import "variables.css";
@import "status-bar.css";

body{
    font-family: 'Open Sans', sans-serif;
}

.welcome-header {
    margin: 90px 0px;
    text-align: center;
    display: flex;
    flex-direction: column;
    align-items: center;
    font-weight: 700;
}

.welcome-header__title {
    margin-bottom: 40px;
    font-size: 25px;
}

.welcome-header__text {
    width: 60%;
    opacity: 0.7;
    font-weight: 400;
}

#login-form {
    display: flex;
    flex-direction: column;
    margin: 0px 30px;
}

#login-form input {
    padding: 15px 0px;
    border: none;
    font-size: 18px;
    margin-bottom: 20px;
}

#login-form input:not([type="submit"]) {
    border-bottom: 1px solid rgba(0, 0, 0, 0.2);
    transition: border-color 0.3s ease-in-out;
}

#login-form input::placeholder {
    color: rgba(0, 0, 0, 0.4);
}

#login-form input:focus {
    border-color: var(--yellow);
}

#login-form input[type="submit"] {
    background-color: var(--yellow);
    cursor: pointer;
    border-radius: 5px;
}

#login-form a {
    text-align: center;
    text-decoration: none;
    color: inherit;
    font-size: 13px;
}
+ 추가 설명
- login-form
→ 세로로 배치되도록 설정.
양옆에 margin 30px.
- login-form input
→ 위아래 padding 15px.
border 없앰.
font-size 18px.
아래 margin 20px.
border-color 서서히 변하도록 transition 설정.
- login-form input:not([type="submit'])
→ type이 submit가 아닌 input에만 적용.
border-bottom 설정.
border-color 서서히 변하도록 transition 설정.
- login-form input::placeholder
→ 글자색 연하게.
- login-form input::focus
→ border-color 변하도록.
- login-form input[type="submit"]
→ 배경색 설정.
버튼 위에 커서가 올라갈 경우, 커서 pointer로 변경.
버튼 모서리 둥글게 설정.
- login-form a
→ 중앙에 오도록.
링크 밑줄 없앰.
글자색은 부모로부터 상속 받음(검정색).
글자 크기 13px
- 프로젝트에서 사용되는 모든 input을 선택했을 때, outline이 생기지 않도록,
reset.css 아래 다음 코드 추가.
→ input을 선택해도 outline이 나타나지 않음.
input:focus {
	outline: none;
}
- 사용할 색 변수로 지정하기 위해,
variables.css 파일 추가 후 변수 지정.
이때 styles.css에 variables.css 파일을 import 해줘야 함.
:root {
    --yellow: #fae100;
}
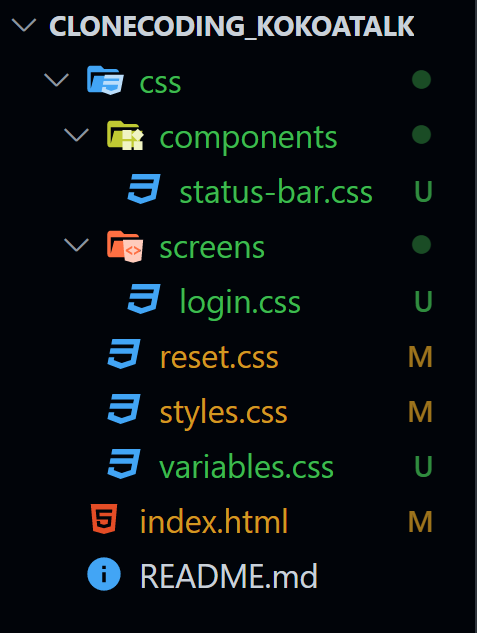
파일 분리
- 아래와 같이 파일 분리.
styles.css import 수정.

페이지 이동(Form)
- friends.html 파일 생성.
- index.html
form에 action과 get을 설정해 버튼을 클릭할 경우, friends.html로 이동하도록 설정.
...
    <!-- Login Screen -->
    <form action="friends.html" method="get" id="login-form">
        <input type="text" placeholder="Email or phone number"/>
        <input type="password" placeholder="Password"/>
        <input type="submit" value="Log In"/>
        <input type="submit" value="Sign Up"/>

        <a href="#">Find Kokoa Account or Password</a>
    </form>
...
결과물

'클론코딩 > 노마드코더 코코아톡' 카테고리의 다른 글
| [클론코딩/코코아톡] 노마드 코더 코코아톡 클론코딩 #6 Setting Screen, Chat Screen (0) | 2022.09.28 |
|---|---|
| [클론코딩/코코아톡] 노마드 코더 코코아톡 클론코딩 #5 수정 및 추가 기능 구현 (0) | 2022.09.28 |
| [클론코딩/코코아톡] 노마드 코더 코코아톡 클론코딩 #4 Chats Screen, Find Screen, More Screen (0) | 2022.09.27 |
| [클론코딩/코코아톡] 노마드 코더 코코아톡 클론코딩 #3 Friends Screen (2) | 2022.09.26 |
| [클론코딩/코코아톡] 노마드 코더 코코아톡 클론코딩 #1 Sign Up Screen (2) | 2022.09.21 |


댓글